|
|
|
|
|||||||||
Click here for part 1 of the beginners guide to Hardanger embroidery Step 3. NeedleweavingRe-thread your needle with the thinner, no. 8 thread. We will use this to needleweave the remaining threads together, creating a neat openwork grid. Fasten on your thread on the back of the work under the kloster blocks where shown on the bottom chart by a grey line to the left of the first kloster block. Separate the four fabric threads into two groups and pass the needle over two, then under two. Reverse the direction and repeat, forming a compact woven bar. Do not pull too tight, just apply even tension to draw the threads together smoothly. Try to count how many stitches it needs to fill the bar so that you can use the same number on the remaining bars. Work the bars in a diagonal direction by working those coloured red on the chart first. Then turn the work and work a second diagonal row in the opposite direction. Step 4. Square Filet'sWhen they are all completed, fill the holes shown on the chart with square filet's. These consist of buttonhole stitches taken into each corner. When you reach the last corner take the needle and thread down over the thread already leading from that corner then pass it through the needleweaving on the back of the work to position it for the next square filet. Do not start a new length of thread when working a diagonal row. To fasten off your thread run it through the back of the needleweaving until you reach the outer kloster blocks then also run it under two or three of these.
You will find further lessons and free hardanger patterns at needlework-tips-and-techniques
|
|||||||||
|
Return to online classes page |
|||||||||
|
© Carol Leather, X-Calibre Designs |
|||||||||
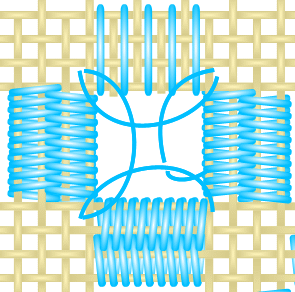 The diagram, left, shows how a square filet is worked. I have shown three bars needlewoven and one as a kloster block as on occasions you will find at least one side of the "hole" is bordered by a kloster block.